Drag

Xactimate Roof Working

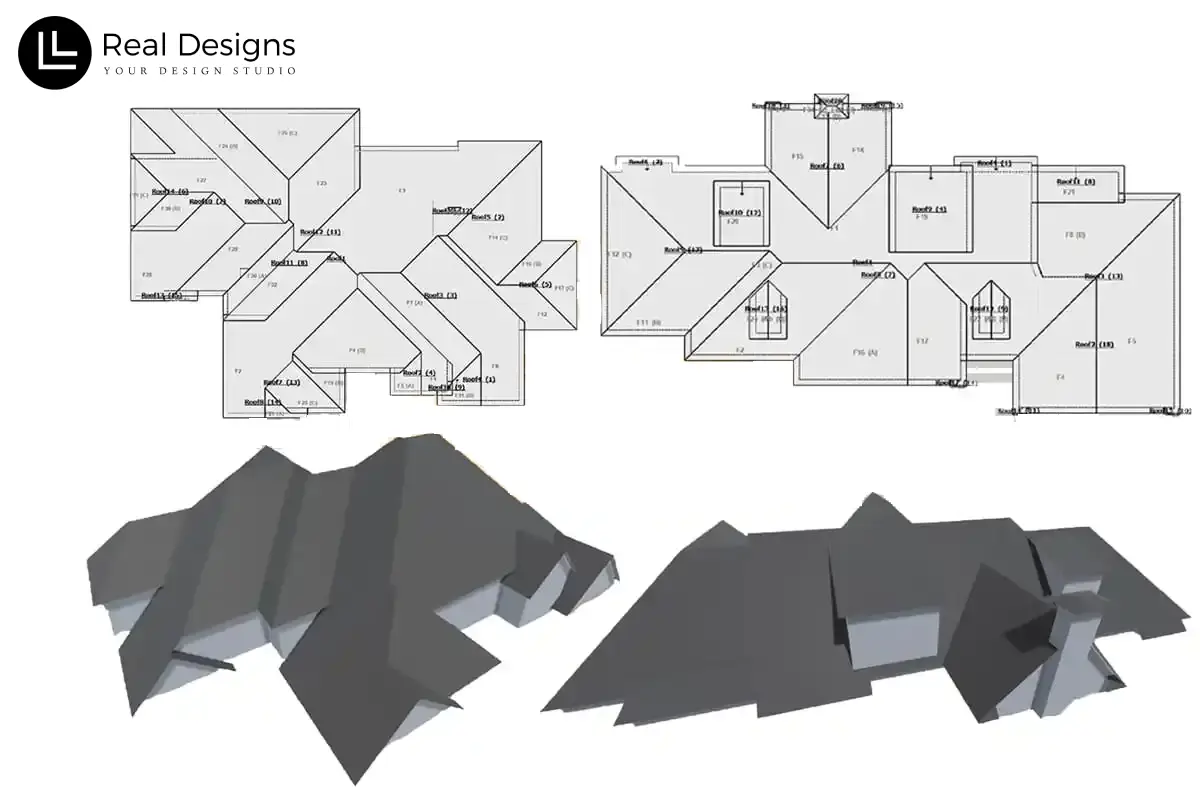
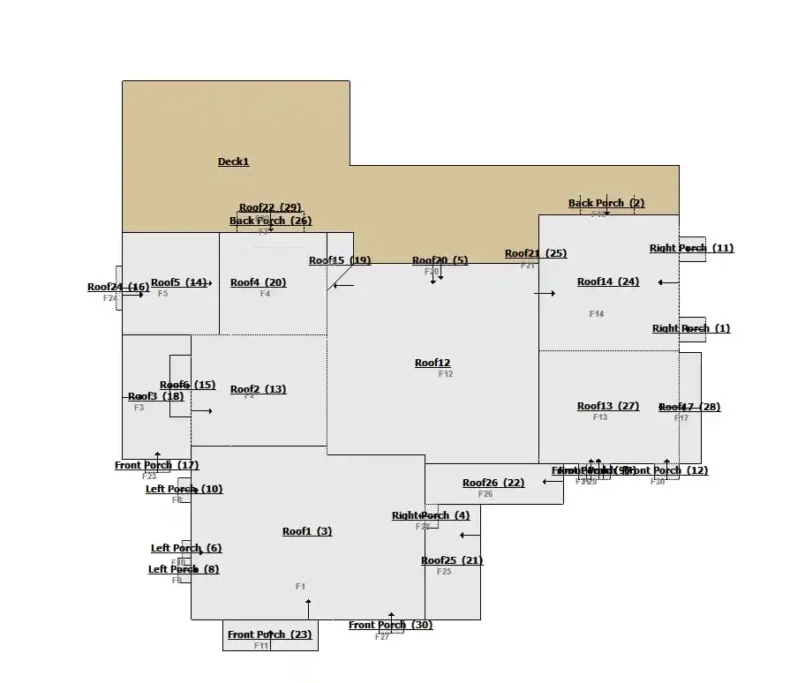
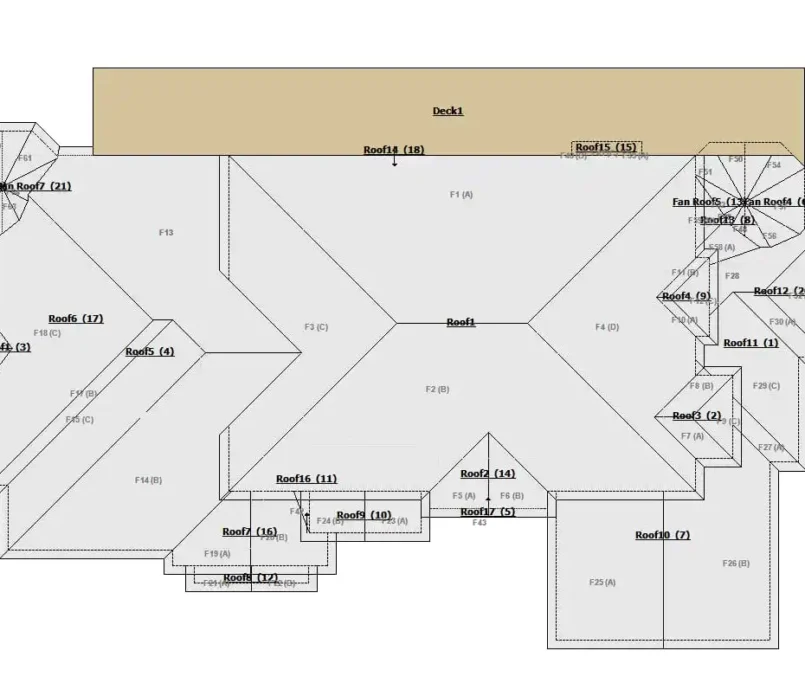
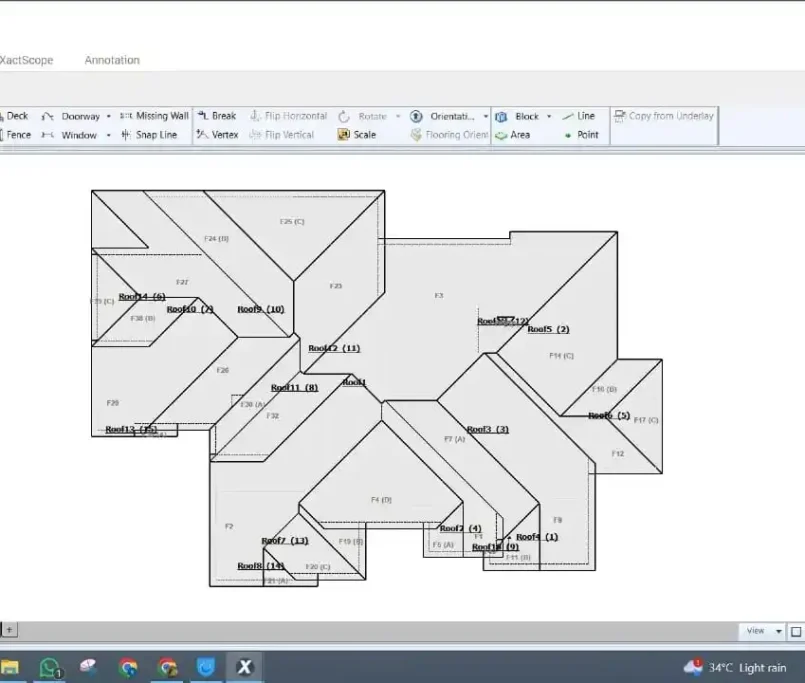
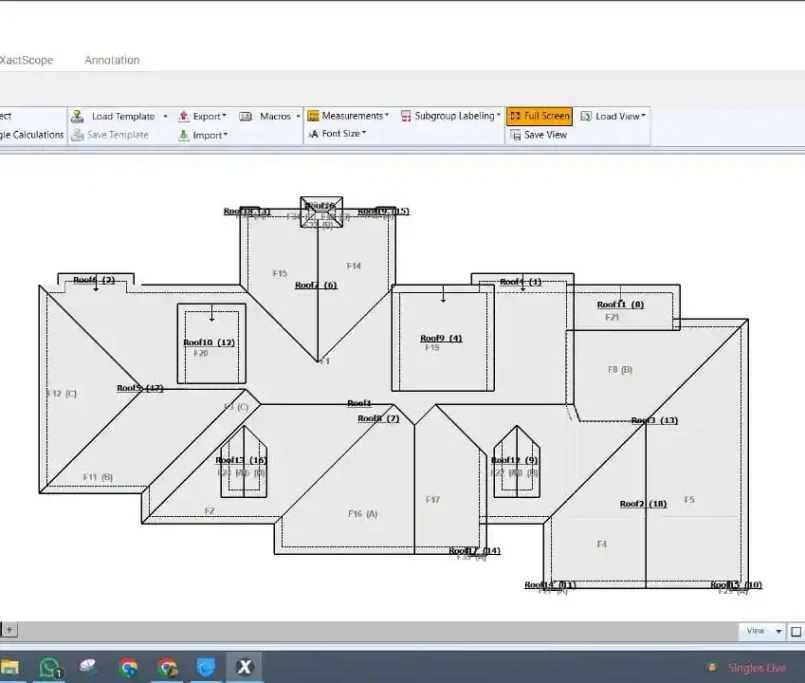
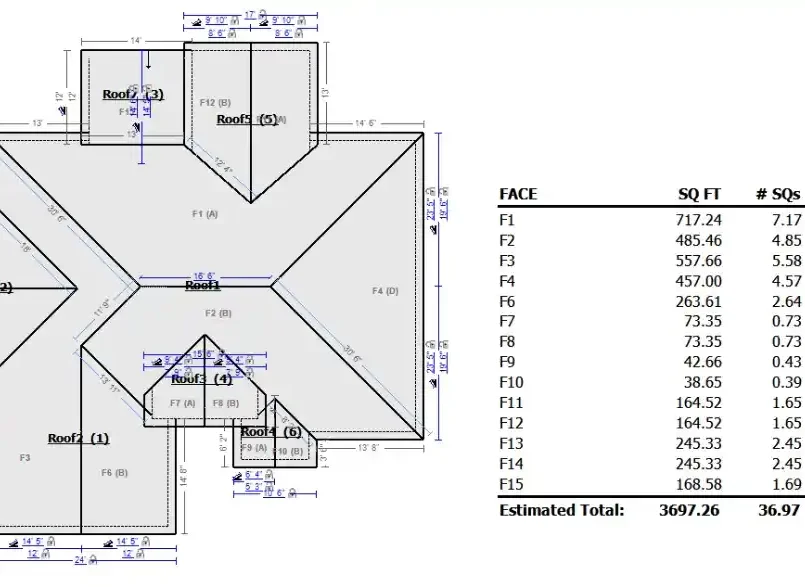
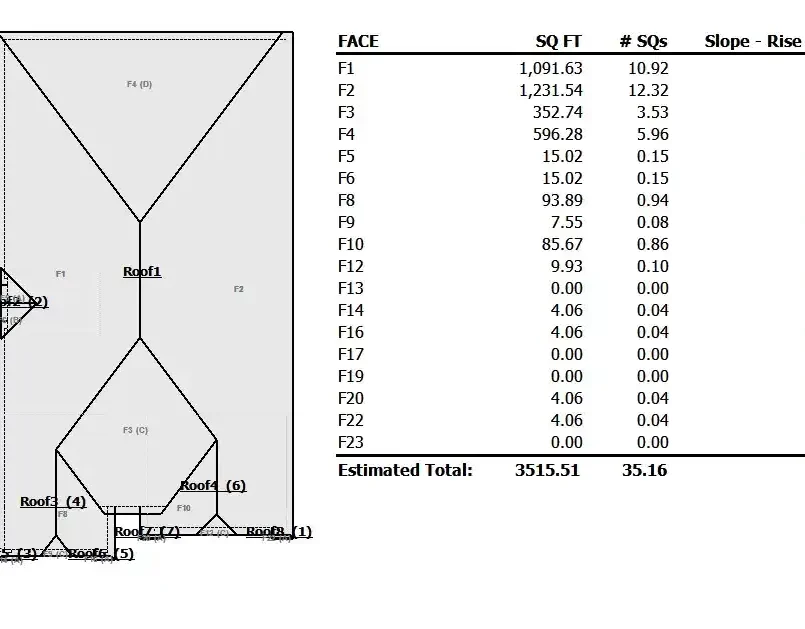
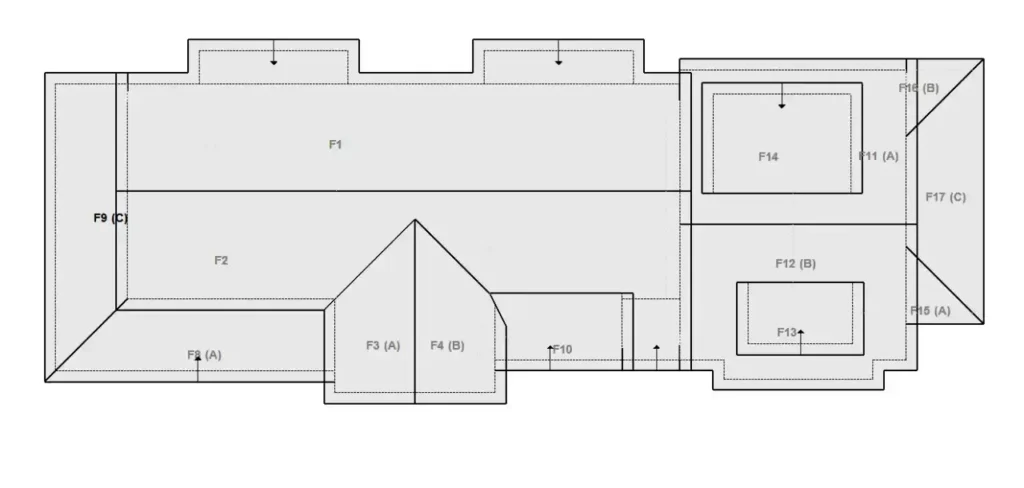
Here’s a truth every insurance restoration contractor in the USA knows: the accuracy of your roof estimate can make or break a job. It’s the foundation of your claim, the blueprint for your work, and the key to your profitability. In today’s fast-paced market, guessing doesn’t cut it. You need precision, speed, and clarity. This is where mastering the Xactimate Roof Sketch isn’t just a skill—it’s a critical business advantage. Real Designs has the powerful tool within Xactimate allows you to transform a complex roof structure into a detailed, data-driven estimate that insurance carriers respect and approve. Whether you’re a seasoned veteran looking to sharpen your skills or a newbie aiming to get it right from the start, this guide is your comprehensive resource. We’re going deep into the process, from integrating an insight roof report to sketching a flat roof on Xactimate, giving you the confidence to handle any project that comes your way.

Why the Xactimate Roof Sketch is Non-Negotiable for Roofing Contractors

Before we dive into the “how,” let’s solidify the “why.” You might be tempted to use generic sketching software or even old-fashioned graph paper, but that approach leaves money on the table and invites delays. About Real Designs Xactimate roofing sketch is seamlessly integrated into the industry’s leading estimating software for a reason.

  • Unmatched Accuracy: Manual measurements and transfers are prone to human error. A miscalculation on a hip valley or a misjudged pitch can throw your entire material and labor cost off. Xactimate’s sketching engine calculates everything for you based on the lines you draw, ensuring mathematical precision.
  • Faster Claims Approval:I nsurance adjusters speak the language of Xactimate. When you submit a claim with a clean, professional roof sketch in Xactimate, you’re speaking their language. It reduces back-and-forth, questions, and reinspections, dramatically speeding up the approval process.
  • Professional Credibility: A detailed sketch shows that you are thorough, technologically adept, and professional. It builds trust with both the adjuster and the homeowner, setting you apart from competitors who use less sophisticated methods.
  • Comprehensive Estimating: The sketch isn’t just a picture; it’s a smart model. It automatically generates your quantities—squares of shingles, linear feet of ridge cap, squares of underlayment—which directly feed into your line-item estimate. This integration eliminates double-entry and ensures your pricing is directly tied to the scope of work.

Getting Started: Setting Up Your Sketch for Success

First things first, you can’t sketch what you can’t see. The era of climbing every roof with a tape measure is fading, thanks to technology. The most efficient way to start your Xactimate roof sketch is by utilizing a detailed roof report.

This is where the keyword add insight roof report to sketch xactimate online comes to life. Companies like EagleView and Hover provide incredibly precise aerial measurements and reports. Here’s how to integrate them:

  1. Order Your Report: After meeting with the homeowner and confirming interest, order a report from your preferred provider using the property address.
  2. Import into Xactimate: Once you receive the report (usually a .CRX or .HIP file), open your estimate in Xactimate. Navigate to the Sketch tab and use the “Import” function. Select the file, and like magic, an accurate 2D diagram of the roof, complete with measurements, will appear in your workspace.
  3. Set Your Scale: The imported image might not be to scale. Xactimate will prompt you to calibrate it. Use a known measurement from the report (e.g., the length of a main ridge) to set the scale accurately. This step is crucial—everything hinges on it.

The Art and Science of Sketching a Complex Roof

Now, with your imported image as a guide, it’s time to build your intelligent sketch. Telling about the Real Designs which has the perfect Xactimate roofing sketch process. You’ll trace over the image with Xactimate’s line tools to create planes.

  • Start with the Basics: Use the “Add Surface” tool to trace the perimeter of each roof plane. Connect your lines to form closed polygons. As you complete each plane, Xactimate will calculate its area automatically.
  • Define the Features: A roof isn’t just a flat surface. Use the “Feature” tools to add hips, valleys, ridges, and rakes. These elements are critical for accurate material takeoffs. For example, defining a ridge will automatically calculate the linear feet of ridge cap needed.
  • Assign Properties: This is where the magic happens. Right-click on each plane to open its properties. Here, you will define the pitch (slope), surface type (e.g., composition shingle, tile, metal), and even the waste factor. The software uses this data to calculate the exact quantities of materials required.
  • Layering for Complexity: For roofs with dormers or multiple levels, use the “Add Level” and “Add Layer” functions. This allows you to sketch elements that sit on top of or behind other planes, creating a true 3D model within the software.

Remember, the goal is to create a clean, organized sketch where every line represents a real-world roof element. A messy sketch leads to a confusing estimate.

Conquering the Unique Challenge: How to Sketch a Flat Roof on Xactimate

Sketch a flat roof on Xactimate follows the same fundamental principles but with a few key differences. The biggest mistake is assuming a flat roof is just a simple rectangle. Drainage is everything.

  1. Pitch is (Almost) Zero: In the plane properties, you will set the pitch to 1/12 or 0/12. Even “flat” roofs have a slight taper for water runoff, which Xactimate can account for.
  2. Focus on Drainage Features: Instead of hips and valleys, your key features will be drains, scuppers, and edge details. Use the “Feature” tools to note the locations of drains, as this impacts labor and material placement.
  3. Surface Type is Key: Be meticulous in selecting the surface type—TPO, EPDM, Built-Up Roof (BUR), or modified bitumen. The cost and labor for these materials vary significantly, and your sketch must reflect the correct choice.
  4. Include Overlays: For flat roofs with parapet walls, remember to sketch the walls surrounding the roof as separate planes. This ensures you capture all flashing and edge metal details in your estimate.

Treating a flat roof with the same detail as a pitched roof demonstrates your expertise and ensures you capture all the costs associated with these specialized systems.

From Sketch to Estimate: Closing the Loop

Your beautifully crafted roof sketch in Xactimate is not a piece of art to be admired; it’s an engine for generating revenue. The final step is to let it do its job.

Once your sketch is complete and all properties are assigned, Xactimate automatically populates the “Room/Sketch” column in your line-item estimate. The quantities for roof coverings, underlayment, and related materials will be filled in with precise numbers directly derived from your model.

Your job now is to review:

  • Do the quantities make sense?Do the total squares align with your experience on similar-sized homes?
  • Are all materials correctly matched?Is the ridge cap associated with the ridge lines? Is the drip edge associated with the eaves?
  • Have all waste factors been applied appropriately?A complex roof with many valleys and hips will have a higher waste factor than a simple gable roof.

This seamless integration is the ultimate payoff for your diligent sketching work. You now have a defensible, accurate, and professional estimate ready for submission.

Advanced Tips and Common Pitfalls to Avoid

Mastering the basics will get you 90% of the way, but the final 10% is what defines a true expert.

  • Use the 3D Viewer: Always toggle into the 3D view to check your work. This visual check can reveal errors in pitch assignment or plane connections that are hard to see in 2D.
  • Don’t Forget the Details: Gutters, downspouts, chimney flashing, and pipe jacks are all part of the roof system. Make sure you’ve added these in and that they are included in your estimate.
  • Avoid Over-Sketching: While detail is good, don’t draw every single shingle. Use the software’s intelligent features to define areas. Your goal is clarity, not clutter.
  • Double-Check Your Report: The insight roof report is a tool, not an infallible bible. Occasionally, obstructions like tree branches can cause errors in the initial measurement. If a measurement looks off, use the software’s measuring tool to verify key dimensions against the image.

Invest in Your Mastery: Training is Key

The Xactimate roof sketch tool is powerful, but it has a learning curve. The best investment you can make is in training. Consider official Xactimate certification courses, online tutorials, and practice. Sketch your own home, your office, your neighbor’s house—anything to build muscle memory.

Becoming fluent in creating a Xactimate roofing sketch is one of the highest-return skills you can develop for your restoration business. It minimizes disputes, maximizes profit, and projects a image of utmost professionalism. Stop guessing and start sketching with confidence.

Quote Now - We have Representator to Serve You!

Get your quote now before its too late!

Get A Quote!

Real Design Studio, a thriving firm with specialty in Real Estate, Architecture and Graphic illustration facets.